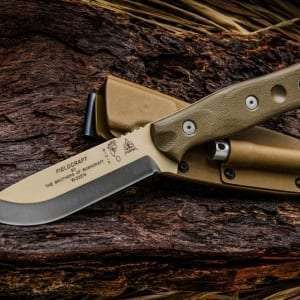
Blog

© Copyright - Survival School Site Built By: Overhaulics
Today you’re going to be introduced to a twined fish trap method I’ve used to survive for years in the wilderness. Hello, I’m Joshua Hamlin, lead primitive skills instructor at SIGMA 3. During my two years living in the wilderness completely primitive and isolated from the world, I used this method extensively for a big majority of my meat.
Primitive skills is such a beautiful thing because of the freedom it gives you to travel at your own will with no money. In todays society we are forced into working jobs we hate, just to pay bills we don’t want. So that we can fit in with society. And this basket fish trap is what kept me from going hungry for years. And it cost me nothing to make and only a few hours to construct. Make sure to watch the video below and read the blog for the real details of how to use the trap in the field.
Tools Used:
-Good Bushcraft Blade (check out this link for suggestions)
-Silky Saw (silky ultra accel or pocket boy are most recommended bushcraft saws)
Note: This can be done with flint-knapped stone blades, but so much faster and efficient with modern cutting tools.
TO GET HANDS ON TRAINING OF THIS TECHNIQUE, CHECK OUT OUR ADVANCED SURVIVAL STANDARD COURSE.
Step 1 (Collect Materials)- Collect river cane (approx. 60 sticks) and very flexible vines. In this case we used kudzu vine, which is an invasive species in our area. You can use a variety of materials for this trap. Anything straight will work for the trap ribs, and anything flexible will work for twining. The vine or roots need be very flexible and not prone to breaking when twisting or bending on itself.
Step 2 (Find soft soil, begin template)- Find a soft soil to jam the sticks into circular sized opening desired. Put the river cane into the ground at the spacing desired. The tighter the spacing, the smaller the fish you can catch.
Step 3 (Tie top together)- Tie the top of fish trap together by wrapping vines around it or by using cordage.
Step 4 (Begin the twining process)- Make a bight or bend in the vine at the desired height just down from the top of the trap. This will vary depending on the size of the trap you plan to construct. Twist over and under making one twist in between each piece of river cane. You want to make the twist tight so that it pulls the river cane spokes together so they are a uniform distance apart all the way around. Skipping this important detail will leave larger gaps for fish to escape, further down the trap where spacing is more difficult to control. (Note: Remember that tree roots will typically work also, as they tend to have greater flexibility. Spruce, cedar, fir, and other conifer trees are usually a great source for flexible roots.)
Step 5 (Twine it down every 6″)- Do the twining method of twisting the vines about every 6-12” down the trap. This will depend on how far the spacing is between the spokes. The tighter you need the gaps to be, the more often you need to twine. For smaller fish plan on doing it every 6 inches.
Step 6 (Finish the bottom of cone, extra twines)- Once you get to the bottom, do several layers of twining to lock the opening of the trap together so that is super secure. Once all the twining is done, you can pull the trap from the soft soil and cut the end spokes to a uniform length.
Step 7 (Make form for funnel cone)- Now its time to make the cone entrance or funnel portion of the trap. This is done in similar manner to the rest of the trap. Figure out the exact size of the opening where the fish will swim through, then jam sticks into the ground matching that opening size. Make sure those spokes are sharpened to a good point. Those points will be one of the reasons the fish can’t escape back out the funnel.
Step 8 (Basket wrap the cone)- Instead of using the twining method for the funnel, like we did the rest of the trap. This time we will use more of a basket making style of weaving. For this you will need a good amount of flexible vines or roots. Jam an odd amount of spokes into the ground, the number of spokes will be determined by how wide you want the opening. But it must always be an odd amount of spokes so that each rotation of wraps around the spokes is different with each pass. Then begin weaving vines over and under all the way around. When you reach the end of a vine, just poke it into the lower wraps to end it. Keep working your way up the funnel with vines until you reach the desired diameter to fit the cone opening for the trap. When you get to the top, cut some longer pieces of vine and jam them into the weave to hold the vines down and keep them from popping out.
Step 9 (Put funnel into trap opening)- Once done, pull it from the ground and test it in the opening of the trap to make sure it fits. You’ll use a sharpened stick to hold the funnel in so that it can quickly be removed later and you can pull the funnel and remove the fish easily.
Now it’s time to set it in the water. There are numerous ways to use this fish trap to catch fish. You can block off a stream and place it in the middle and physically drive fish towards your trap. Or you can place it in a high fish population area and leave it baited. Either method is effective but most streams and rivers will require the baited method. As blocking off a stream or forcing fish towards your trap is not always feasible. Wherever you place it, make sure it is feasible to check regularly and make sure it won’t be washed away in high water or after rains. Stick it in areas the fish also use as sanctuary from the current or larger predator fish.
Like most all fish2 traps, early in the morning and right before sunset is typically best. You might even check it at night before the sun comes up because sunlight can make it easier for the fish to navigate out of the trap.
Fish guts, heads, tails, etc are a great choice. They will attract crawdads and small fish, and those will attract the more edible game fish. If you don’t have any fish parts to use then maybe you can catch some crayfish, minnows, frogs, or other small game. Smash them up and place them inside for the fish to feast on. You want to essentially make your trap a chum source. A perpetual place of feeding for smaller fish, that will attract the larger fish to come check it out. Numerous things will work, just be inventive and see what your area has to offer.
Sometimes its immediate and other times it make take days or weeks for fish to pay attention to it. New traps have a smell to them and fish are sometimes weary of them. SO be mindful that if it isn’t working immediately, give it time. You may also need to adjust your bait choices or placement of the trap several times before it begins working. But these types of traps have been used by primitive cultures all over the world for millennia. The concept works in most areas and will most likely work for you with some adjustment.
Absolutely not! The most important thing to remember about primitive trapping of any type, is that it’s a numbers game. The more traps you build, the higher your odds of being successful in catching a sustainable amount of food to get you through. If you plan on doing long term wilderness living, then you will need lots and lots of fish to sustain you through the dry times.
Fishing won’t always be good and just like hunting it can be seasonal. So you need to catch as many as you can and then put those excess fish up for later. Using methods such as cold smoking or normal smoking methods. You can also sun dry fish if you live in a hot dry environment, but smoking is always preferable. Because the smoking process coats the meat with oils that will protect it from future moisture, as well as ward off bacteria wanting to grow on the meat.
There is no one fish trap that will work for everything, but this is probably the most effective long term wilderness living technique I could show you. I used it myself for years all over the country to survive and you can too. It takes a lot of practice to get these techniques down and while this demonstration is good enough to show you the way. Its not nearly as efficient as coming and learning from me in a class. Blogs and videos will never be as good as learning from a teacher in the field.
If you have an interest in training with us, then please check out our schedule and see if one of the dates works for you. Please contact us at 4175228172 if you have any questions about this technique or anything else we teach. Thanks for your continued support of SIGMA 3 and the best way you can say thanks for this free info is by sharing this blog on social media with your friends.
For other articles on survival trapping visit: To Kill or Not to Kill?
Lead Primitive Skills Instructor, SIGMA 3 Survival School
A lot of people look at Armadillo as some kind of taboo food for consumption unless it’s under extreme survival circumstances. Well I’m here to tell you that not only is it safe but it also tastes great. If you like pork then you’ll like Armadillo as well! They are basically just armored pigs that live in the ground and they are super easy to catch. For fun a lot of people try to sneak up on them and pick them up, which is very easy to do. These animals have such poor eye sight that you can usually sneak up on them with relative ease if the wind is in your favor. I’ve literally snuck up and pet them without them even knowing I was there. While they do have terrible eye sight remember that their great noses is what will give you away the quickest.
What is the best way to catch them?
Since they are typically nocturnal animals, you will most likely see them roaming around in the woods at night time. In fact, most small game animals are nocturnal and that is simply the best time to catch them. Don’t forget that hunting at night for most things is illegal and these techniques should only be used for survival purposes.
Just like you would go gigging frogs or spotlighting a deer, you can use a flashlight to distract your game while you walk up to them and dispatch them with a big stick or other weapon. Simply shine the light in the eyes of Armadilllo then walk over and pick him up to dispatch them. Sound is of the utmost importance when stalking them so you must not make a sound when approaching them. The light will blind them from seeing you but it won’t stop them from hearing you so walk softly. You can also stalk up to them in the daytime as well but your chances of success are much lower.
These animals are hard to trap without a live game box trap of some type because they just aren’t as likely to walk into a trap. You can also quickly construct a quickie bow to shoot them with if you can’t get close enough. It is much easier to catch them or hunt them actively during the best times though. The best time to get them are always during night or during low light. When looking for places to hunt them you need to look for places that have an abundance of food for them. They primarily root up bugs and eat underground tubers so you will want to look in areas that have an abundance of good soil. They will roam almost anywhere but your highest likelihood of catching them is near their feeding areas. They also tend to shelter underground by digging elaborate tunnels where they hole up as a group. These holes they dig can also be snared or trapped to catch them coming and going.
How to Clean & Butcher Armadillo
The Armadillo is just like every other animal except that it has a shell around it that makes it very convenient for cooking. The animal should first be gutted and all the entrails removed and set aside for other survival uses. Once the animal is gutted and well cleaned then we are going to stoke the fire up and use the flames to singe all the hair off it’s body. Once the flames have burnt the hair off then you need to scrape off some coals to one side to create a cooking fire. Then set the armadillo in the coals with the shell facing down into the coals. This shell will help us cook it without losing any of it’s fat to fire. It is really essential is survival that you don’t allow fat to drip into your fire being wasted. So by keeping the shell on this will preserve all the calories in the meat. You need to slowly turn the animal so that it cooks evenly all over the shell and make sure that the stomach area meat is well cooked. This is not an animal you can afford to eat medium rare because just like pigs they have parasites and diseases we must be mindful of. Make sure you cook it well done and that all the meat is cooked evenly over the whole carcass. If one section of the meat is not done then don’t eat it and re-cook that area for safety. You can also slice the excess fat off the animal and render the fat for later use. This will provide you with lard that can be saved for other cooking projects later. This fat can also be used to burn as a bush candle if light is needed at your camp.
[wooslider slider_type=”attachments”]
Dangers of Eating Armadillo
A lot of people absolutely won’t eat an Armadillo because they have heard that you can get Leprecy from handling them. While some of the animals do carry the disease it is a very small percentage of the population and most people aren’t susceptible to the bacteria. The bacteria is easily killed by cooking it well done and as long as you don’t have any open cuts on your hand then you should be fine. You must remember that you should not clean animals with open cuts and if you do then you need to wear gloves. Don’t forget to clean up and sanitize your hands the best you can after you’re done cleaning the animal. Armadillo is no different than eating pork because swine can carry all kinds of nasty diseases/parasites as well so don’t be overly worried about this meat source. If you love eating bacon then you shouldn’t sherk away from some slab of Armored Pork! It is always best to eat the cleanest eating animal you can get but the best meat to eat is usually the hardest to get. So this is a good first start for meat procurement when in survival mode. You always start with small less desirable game and work your way up to better tasting animals in your survival priorities.
What is leprosy? A bacterial disease, also known as Hansen’s disease, which causes lesions, growths and dryness on human skin. Your chances of getting leprosy are really, really low. Ninety-five percent of the population isn’t even susceptible to the disease, according to the Health Resources and Services Administration. A 2008 study put to rest the belief that you can get leprosy from eating armadillo. Of some 2500 armadillos caught and tested in Florida, none had leprosy. And for many years researchers were hard pressed to find someone in the United States with leprosy who had actually been in physical contact with armadillos in the United States.
Nutrition Facts Breakdown
All in all, Armadillo meat is extremely high in fat and looks very much like a pig meat when you slaughter it. In fact, it is one of the highest calorie small game animals that you can catch. A pound of meat will bring between 700-1200 total calories depending on the fat content and time of year the animal is harvested. So if you catch a 10-15 lb Armadillo then you can be assured to get a minimum of 5,000 calories from it.
Range & Species of Armadillos
The range of these animals is wide spread all over the south of United States, ranging all the way down to South America. Considering how spread out they are over North America to South America, this is a very good pick for survival hunting. There are numerous species of Armadillo ranging in all sizes from super small to extremely large. The giant species can grow in excess of 60 inches long and over a 100lbs in weight. What a meal that would be! While the smaller species can be a little as 6 inches and only a few pounds.
Common South American Dish
Conclusion:
While Armadillo doesn’t seem to be the most appetizing of survival foods, it is in fact very tasty and extremely high in calories. Combine that with the fact that they are very stupid and easy to catch makes them the perfect food choice for the primitive survivalist. On top of that they aren’t regulated by most state laws and have no seasons or regulations for taking them. What is there to lose with some proper precautions? We totally recommend that you get out there and try this food and see if it is a potential calorie source for your survival needs!
If you have any questions about this subject please post them in our Facebook Group “The SIGMA 3 Survival University”.
By Robert Allen
President
SIGMA 3 Survival School
SIGMA 3 Survival School is very proud to announce that we are going GLOBAL and we have now expanded down into the Amazon jungle in Peru. We now have access to two major jungle facilities that have all the amenities one needs for training. One facility is located near town and has all the modern amenities that a jungle village should have and then we have another more remote 1000 acre property that is deep in the jungle. The courses will be a hybrid of a vacation and jungle survival learning experience. You will be immersed into the jungle lifestyle almost immediately and you will not only learn jungle survival skills but you will get to relax and enjoy your time in the jungle as a vacation also. You will have the opportunity to catch your own fish on the beach, harvest your own fruit, and bath in the beautiful waterfalls of the Amazon river. This a huge once in a lifetime opportunity to go on an expedition/vacation that other trips could never compare with. You will travel by boat, boat plane, off road vehicles and more in order to get to our destination. This course will be 14 days plus travel time and cost approximately $3000 with all expenses covered. Your cost to us for the course is $1995 and then you will have to handle your plane flight into Peru and then we will take over from there!. If your interested in going on a jungle survival trip with us to one of the most remote places on the planet then get your reservations now!
What will you learn?
-Primitive Jungle Shelters
-How to procure water in the jungle
-Machete Only Survival
-Friction Fire methods of the Amazon
-How to trap small game and fish
– And so much more!
Click the Pic below for more info!